Black Friday Our biggest deal of the year is coming soon Get notified →
Setup guide · Mac · Version 2.2

Set up PremierVPN on Mac

Install from the Mac App Store, sign in and click Connect. It takes a couple of minutes. This guide covers every screen and setting: the five protocols, locations, the kill switch, auto-connect, the Security Dashboard and the menu bar.

  • A Mac and the Mac App Store
  • A PremierVPN account, or create one in the app
  • An internet connection
1 Install

Install PremierVPN from the Mac App Store

Use the button below, or open the App Store on your Mac and search for PremierVPN. Click Get, then Install, and confirm with Touch ID or your Apple Account password. When it's done, click Open, or find PremierVPN in your Applications folder or Launchpad.

It's the same PremierVPN app as on iPhone and iPad, and one account covers every device.

Used the old PremierVPN download for Mac?

We no longer offer a separate download. Install PremierVPN from the Mac App Store instead and sign in with the same account. If the old version is still in Applications, quit it and move it to the Bin.
2 Sign in

Sign in, or create an account

The Welcome screen has two buttons: Create account and Sign in.

Sign in
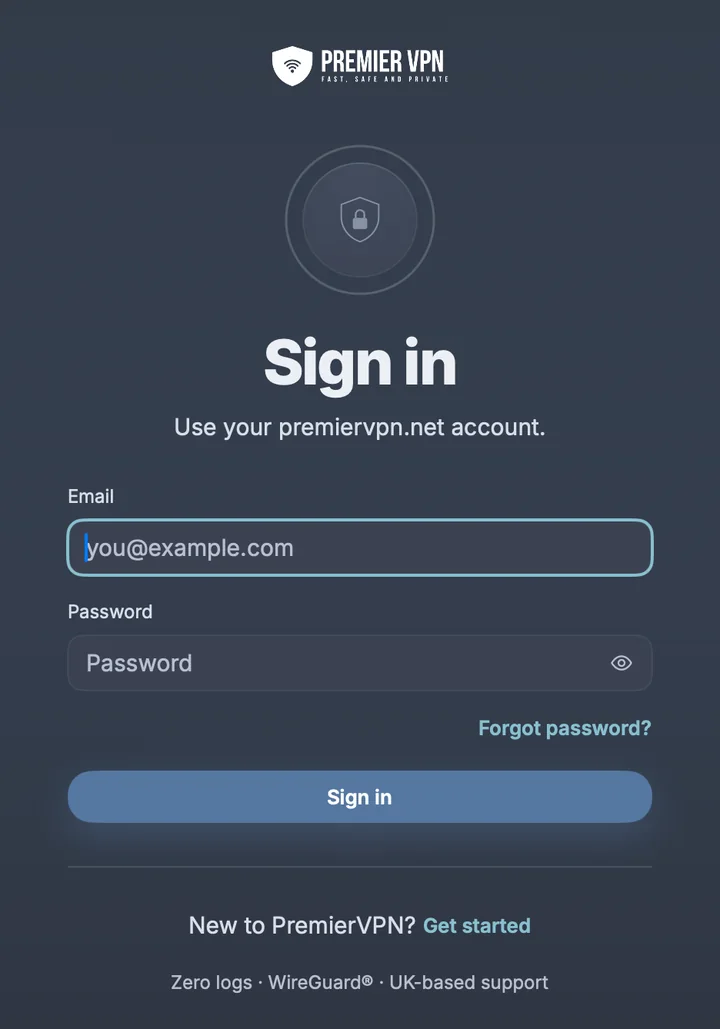
Use the email and password for your premiervpn.net account, the same login as portal.premiervpn.net. If two-factor authentication is on, enter the 6-digit code from your authenticator app; pasting the code fills all six boxes.
Create account
Enter your email and a password of at least 10 characters, then choose a plan (step 3).
Forgot password?
Emails you a link to reset it.

Signed up with Google or Apple on our website?

Set a password before signing in to the app. Log in to the portal, open Settings and set one there.

Sign in screen in PremierVPN for Mac: use your premiervpn.net account, with email and password fields, Forgot password, Sign in and Get started
Sign in
3 Choose a plan

Pick a plan, if you don't have one

If you already pay on premiervpn.net, you won't see this screen: your plan is picked up when you sign in. New accounts, and accounts without an active plan, choose one here:

  1. Pick Monthly or Yearly. The yearly option shows the saving and the price per month. Prices come from the App Store, in your own currency.
  2. Click Continue. The App Store asks you to confirm the purchase with your Apple Account.
  3. The app shows Activating your plan… while it links the purchase to your account, then You're all set.
  • Restore purchases re-links an App Store subscription you already have, for example after reinstalling or on a new Mac.
  • Waiting for approval means Ask to Buy or a family purchase: the plan starts once it's approved.
  • Already linked to another account means that Apple subscription belongs to a different PremierVPN account. Sign in with that account, or contact support to move it.
4 First-run setup

Three quick steps the first time

Each has Not now, and skipping one never blocks the app.

VPN configuration
Click Continue and macOS asks to add a VPN configuration. Click Allow. The kill switch only works once it's added. You can remove it later in System Settings › VPN.
Notifications
Click Allow notifications to hear about connection changes only: drops, reconnects and IP changes. No marketing.
Your look
Choose Glass or Signal (step 12), then click Get protected to open the Overview.

If you skipped the VPN configuration, a Finish setup banner stays at the top of the window until it's added.

5 Connect

Click Connect

Press Connect on the Overview, use the menu bar, or press ⇧⌘Return. PremierVPN connects to the location you've picked with the protocol chosen in Settings. With no location picked, it uses the fastest standard location it has measured.

  • Clicking a location while disconnected only selects it; press Connect to go. Clicking one while connected switches straight to it.
  • The line under the headline names the location and protocol, for example "London · WireGuard". On VLESS it shows which server it's trying.
  • In the Signal style, Disconnect needs a press-and-hold of about a second, so it can't happen by accident. From the keyboard it asks you to confirm instead.
StateGlassSignalButton
DisconnectedNot protectedExposed.Connect
ConnectingConnecting…Connecting.Cancel
ConnectedProtectedSecure.Disconnect
Network changedReconnecting…Rerouting.Cancel
FailedCouldn't connectBlocked.Try the next protocol

When a connection fails, the reason is shown with a button for the next protocol to try (step 6).

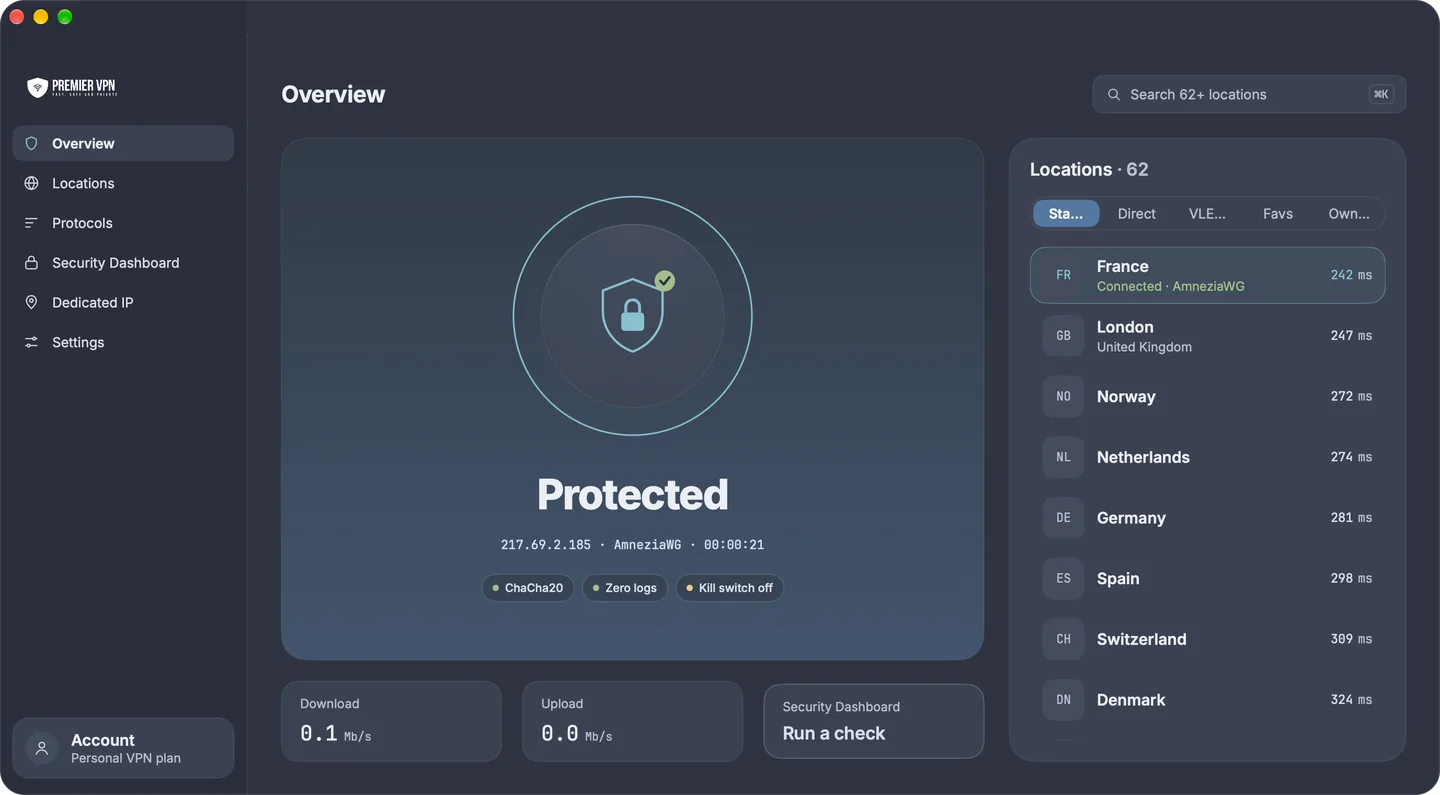
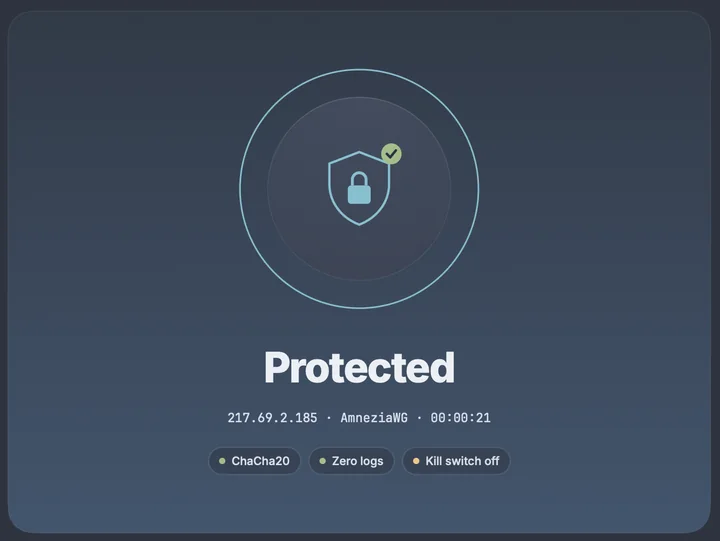
The Glass connect orb showing Protected, with the exit IP, AmneziaWG, the connection time, and chips for ChaCha20, Zero logs and Kill switch off
Connected · Glass
The Overview in the Glass style: the sidebar, the connect orb showing Protected, download and upload speeds, a Security Dashboard card and the list of locations with their latency
Overview · Glass
6 Protocols

Choose a protocol

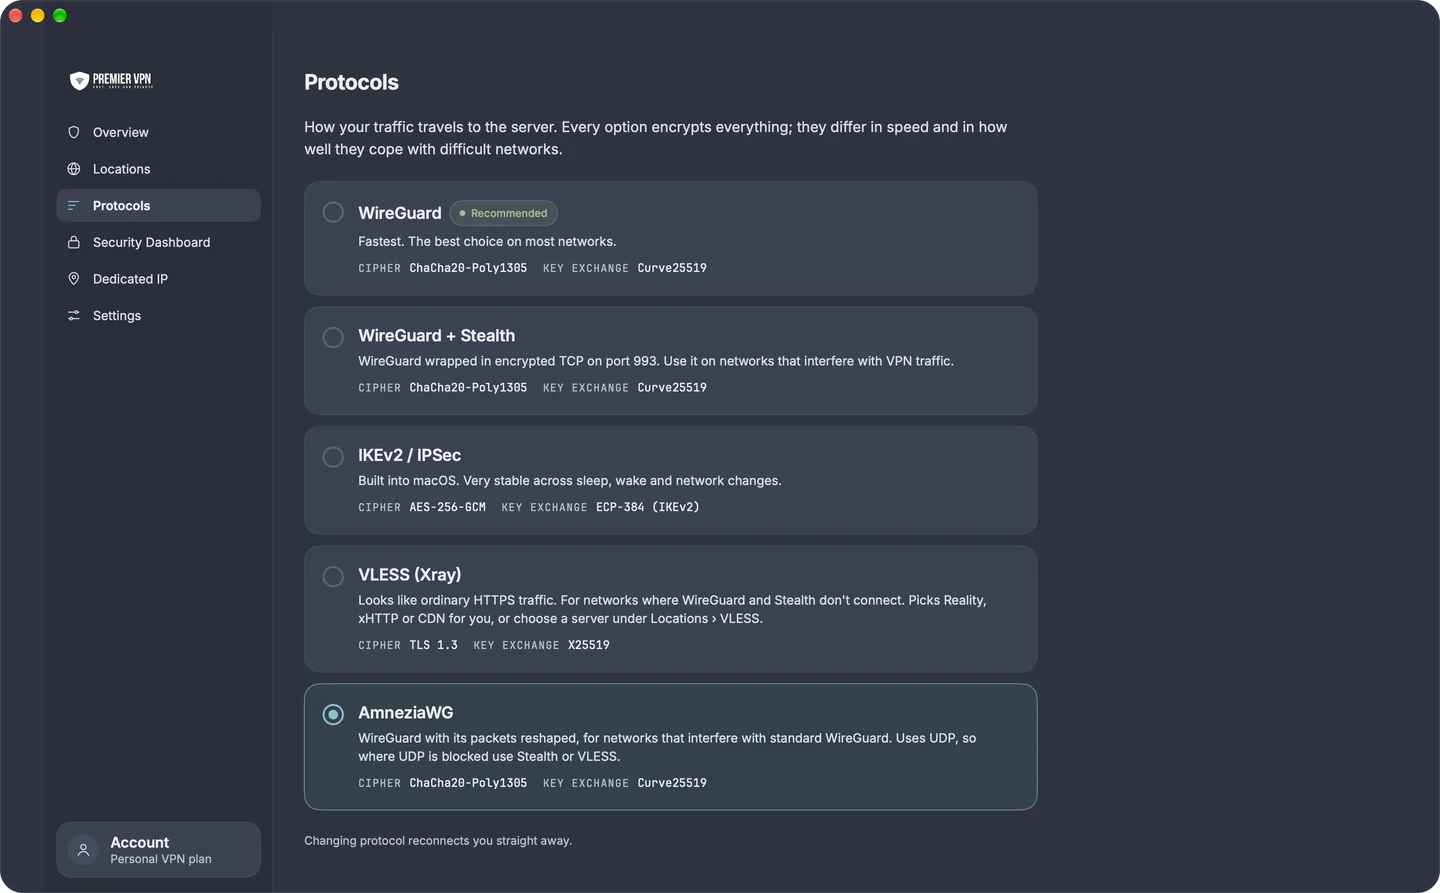
A protocol is how your traffic travels to the server. Every option encrypts everything; they differ in speed and in how well they cope with difficult networks. WireGuard® is the default and the right choice on most networks. Choose under Protocols in the sidebar (⌘3) or in Settings › Connection › Protocol. Changing it while connected reconnects you straight away.

WireGuard®
Modern and lightweight. Most networks; the fastest. ChaCha20-Poly1305, Curve25519.
IKEv2 / IPSec
Built into macOS. The most stable across sleep, wake and network changes. AES-256-GCM, ECP-384.
Stealth
WireGuard® wrapped in encrypted TCP on port 993. Networks that interfere with VPN traffic.
AmneziaWG
WireGuard® with its packets reshaped. Networks that interfere with standard WireGuard. It uses UDP, so it won't help where UDP is blocked.
VLESS
Looks like ordinary HTTPS traffic: Reality, xHTTP, CDN or Vision. Networks where WireGuard and Stealth don't connect. TLS 1.3, X25519.

When a connection fails

The app suggests the next protocol, one click at a time:

  1. WireGuard or IKEv2
  2. AmneziaWG
  3. Stealth
  4. VLESS
  5. Try again
  • The suggestion applies to that connection only. Your protocol in Settings stays as it is, and disconnecting goes back to it. To keep using the one that worked, set it in Settings › Connection › Protocol.
  • If a location doesn't offer AmneziaWG, the app says so and suggests Stealth. A location where AmneziaWG has just failed is skipped for 30 minutes, unless you chose AmneziaWG yourself.
  • With VLESS and a normal location selected, the app tries up to four VLESS servers in that country, best first, starting with the type that last worked.
Protocols screen: WireGuard (recommended), WireGuard + Stealth, IKEv2 / IPSec, VLESS (Xray) and AmneziaWG, each with a description, cipher and key exchange
Protocols
7 Locations

Choose a location

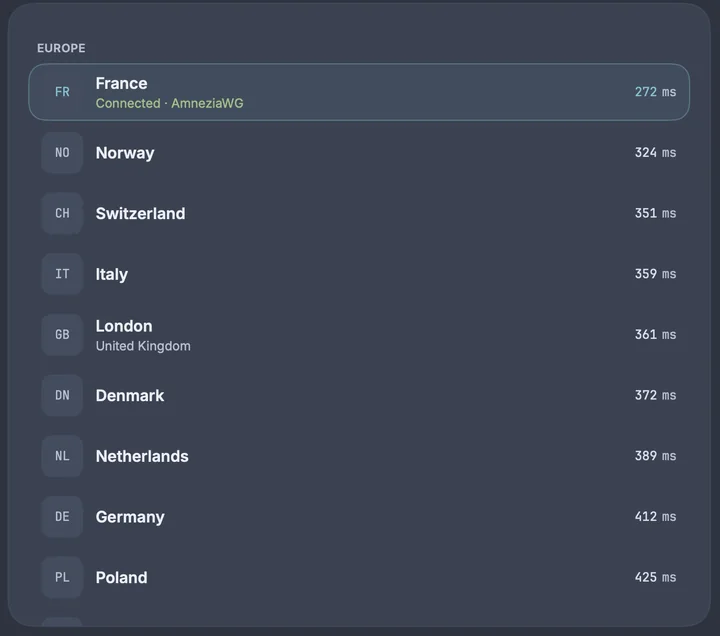
Locations (⌘2) lists every server in five tabs, each with live latency and the protocols it supports. Standard is the right choice day to day.

Standard
The main locations, by country and city.
Direct
Individual servers reached by IP address. Use these when a network interferes with DNS lookups, a standard location won't connect, or you want the same server and exit IP every time.
VLESS
VLESS servers grouped by type (step 6). Picking one connects to exactly that server; if it's blocked, the app tries the other types at that location.
Favs
Locations you've starred. They also appear in the sidebar.
Own IP
Your dedicated IPs (step 8).
  • Search by country, city or hostname with ⌘K. Filter by Europe, Americas, Asia Pacific or the Middle East, and sort A to Z or by latency.
  • Click the star to add a location to your favourites.
  • In the Signal style, double-click a location to connect, and press ⌘C to copy its hostname.
The Standard list of European locations with their latency, with France connected over AmneziaWG
Locations · Standard
8 Dedicated IP

Use an IP address that's yours alone

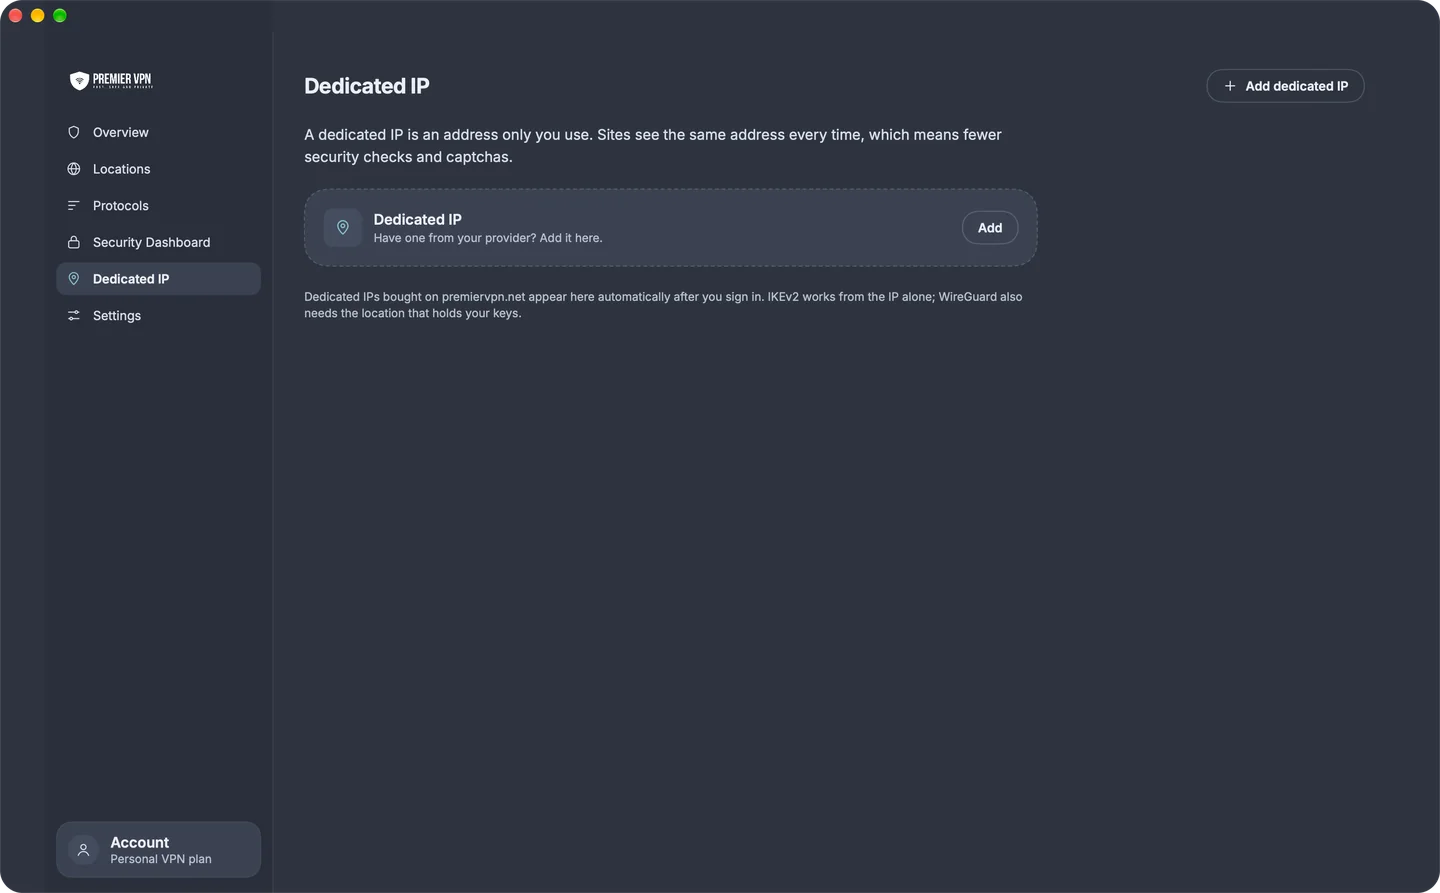
A dedicated IP is an address only you use, so sites see the same address every time and show fewer security checks and captchas. Open Dedicated IP (⌘5) or the Own IP tab in Locations.

  • Dedicated IPs bought on premiervpn.net appear automatically after you sign in, marked From your account.
  • Add dedicated IP adds one by hand: enter the IP or hostname and choose the protocols. IKEv2 is recommended because it works from the IP alone; WireGuard® also needs the location that holds your keys.
  • Dedicated IPs use WireGuard® or IKEv2 only.
Dedicated IP screen with an Add dedicated IP button and a note that dedicated IPs bought on premiervpn.net appear automatically after you sign in
Dedicated IP
9 Stay connected

Kill switch, auto-connect and reconnect

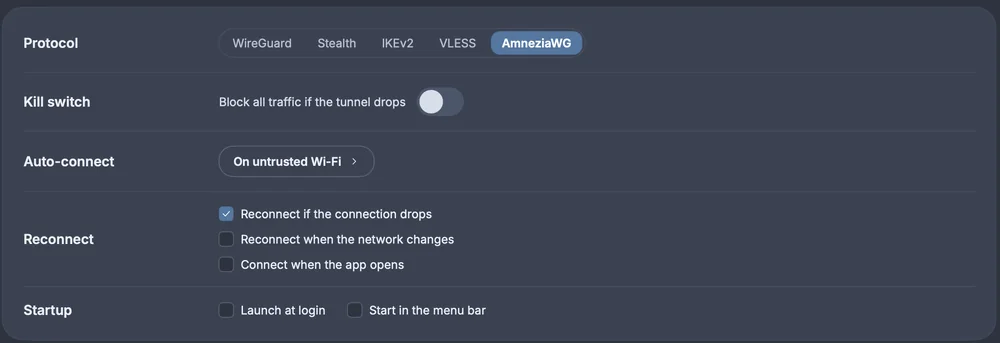
Three settings in Settings › Connection keep your Mac protected without you thinking about it.

Kill switch

"Block all traffic if the tunnel drops." It works with WireGuard® and AmneziaWG; Stealth, IKEv2 and VLESS don't use it, and the setting says so when one of those is chosen. It switches on once the tunnel is confirmed working, so it never blocks the connection itself.

Armed
On, and protecting this connection.
On
On, and will protect the next connection.
Off
Turned off in Settings.
Not used
On in Settings, but the current protocol doesn't support it.

If the network drops or changes with the kill switch on, a banner explains that traffic is held until the tunnel is back.

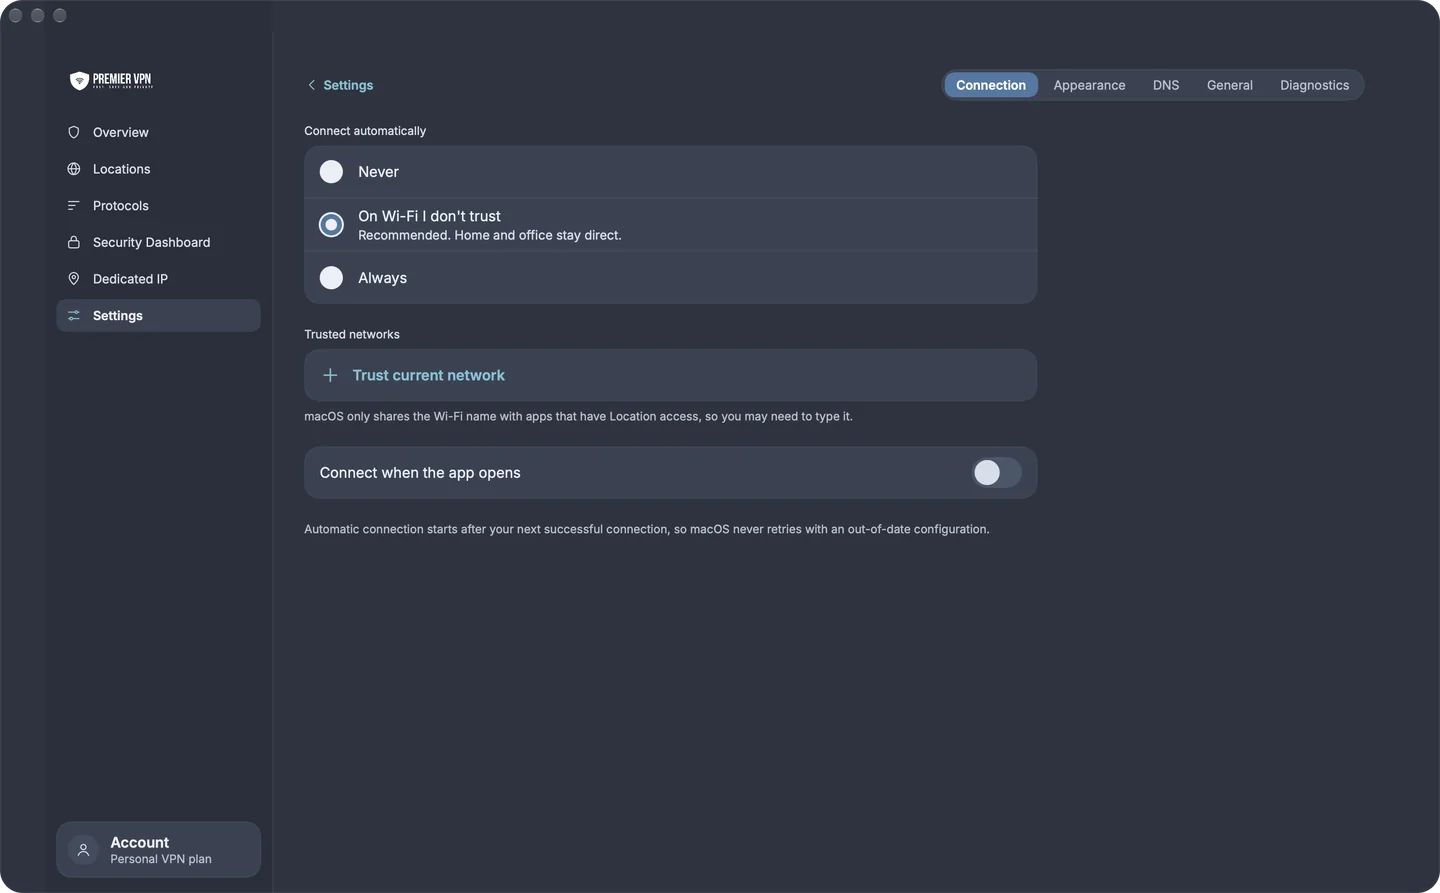
Auto-connect

Starts the VPN without opening the app.

Never
Connect only when you choose.
Untrusted Wi-Fi
Recommended. Home and office stay direct: add them with Trust current network, or type the Wi-Fi name. macOS only shares the Wi-Fi name with apps that have Location access.
Always
Every time the Mac goes online.

Auto-connect starts after your next successful connection, so macOS never retries with an out-of-date configuration.

Reconnect

  • Reconnect if the connection drops (on): after sleep or a dead session, it reconnects to the same location on the same protocol.
  • Reconnect when the network changes, for example from Wi-Fi to Ethernet.
  • Connect when the app opens.
Connection settings: protocol, the kill switch toggle, auto-connect on untrusted Wi-Fi, three reconnect options, and launch at login and start in the menu bar
Settings · Connection
Auto-connect settings: Never, On Wi-Fi I don't trust (recommended) or Always, with Trust current network and Connect when the app opens
Settings · Auto-connect
10 Security Dashboard

Check how protected you are

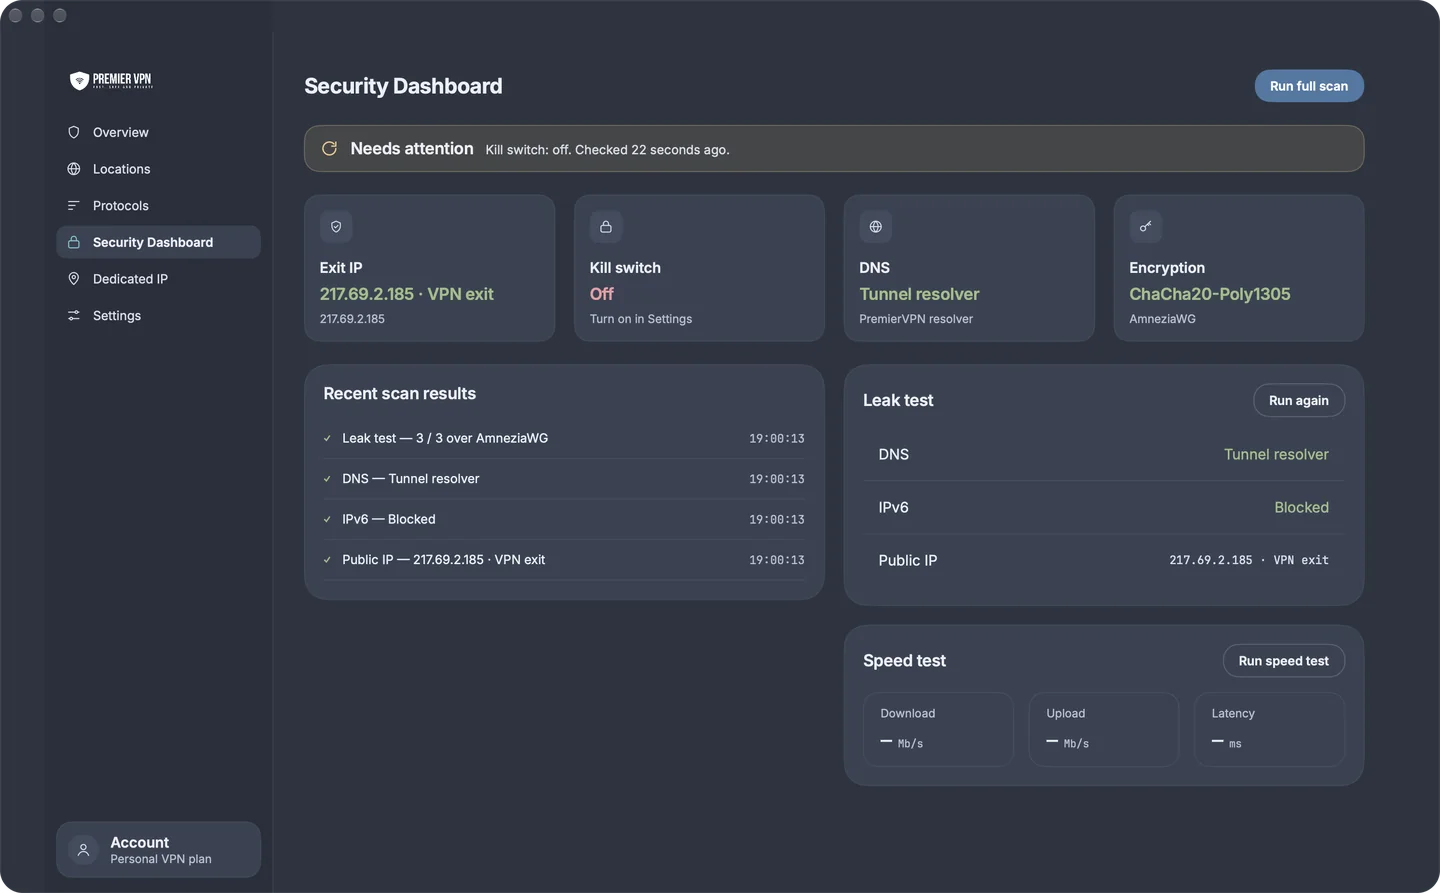
The Security Dashboard (⌘4) runs a scan when you open it, and again each time the VPN connects or disconnects. Run full scan or Run again runs one by hand. The banner at the top sums it up: All checks passed, Needs attention, or You're not protected right now.

Exit IP
The public IP sites see. It passes when it's the VPN server's address, not yours.
Kill switch
Armed, On, Off or Not used (step 9).
DNS
Whether lookups go through the tunnel, and which resolver.
Encryption
The cipher in use, for example ChaCha20 or AES-256. "None" when disconnected.
Leak test
DNS: Tunnel resolver passes. IPv6: Blocked passes. Public IP: passes with the VPN address. What this means explains the result in plain words.
Speed test
Download, upload and latency over your current connection. A quick way to compare locations and protocols.
Security Dashboard: a Needs attention banner because the kill switch is off, cards for exit IP, kill switch, DNS and encryption, recent scan results, a leak test and a speed test
Security Dashboard
12 Settings

Adjust your settings

Settings (⌘6) has six sections: Connection, Appearance, DNS, General, Diagnostics and Account. The defaults suit most people. Connection is covered in step 9 and Account in step 13.

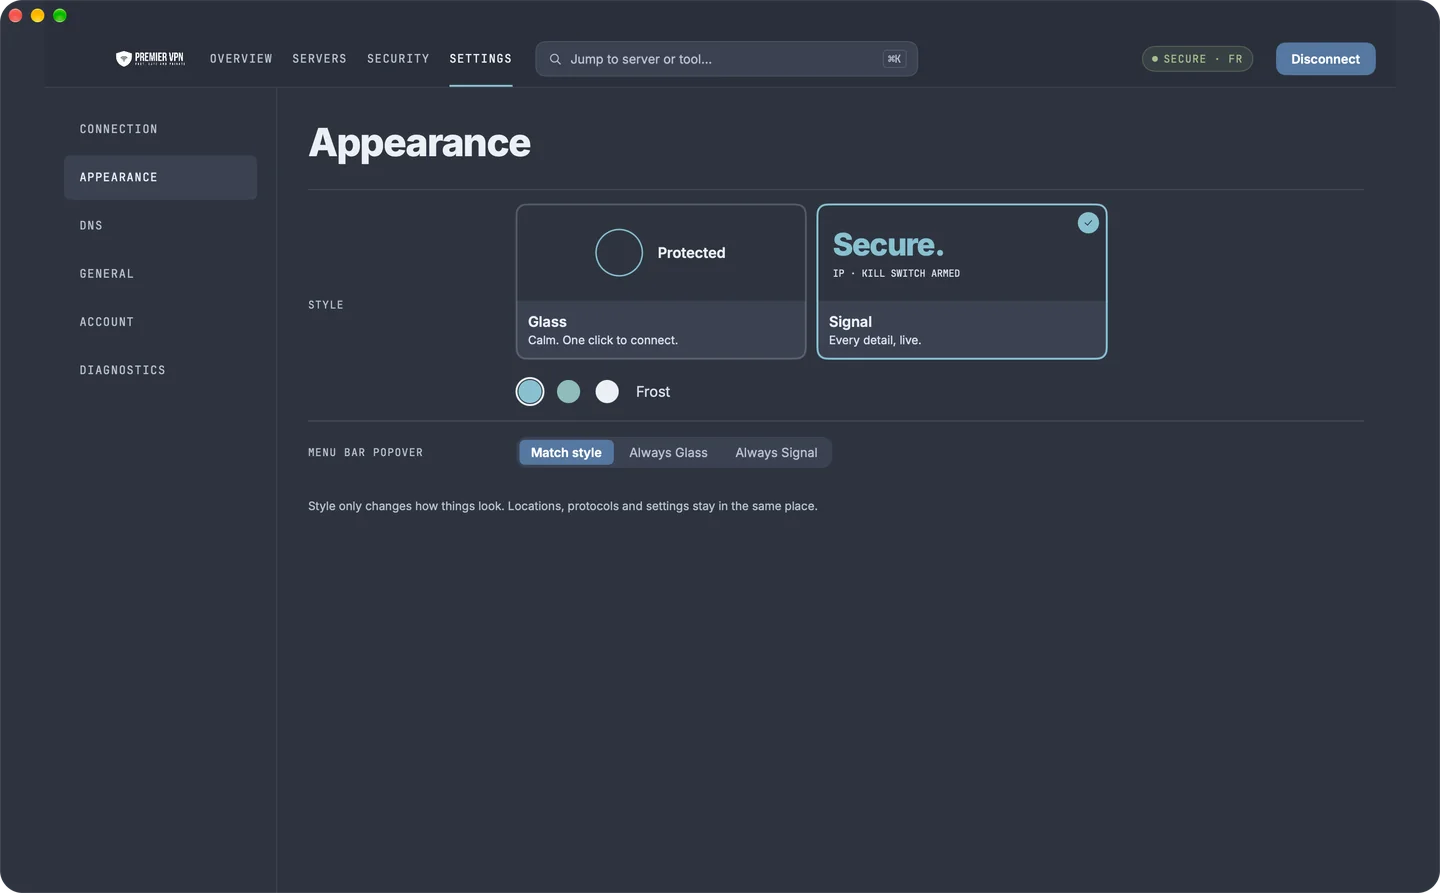
Appearance

Style
Glass: soft and rounded, with a sidebar and a large connect orb. Signal: dense and data-led, with tabs across the top (Overview, Servers, Security, Settings), live charts and keyboard hints. Only the look changes.
Accent
Frost, Teal or Snow.
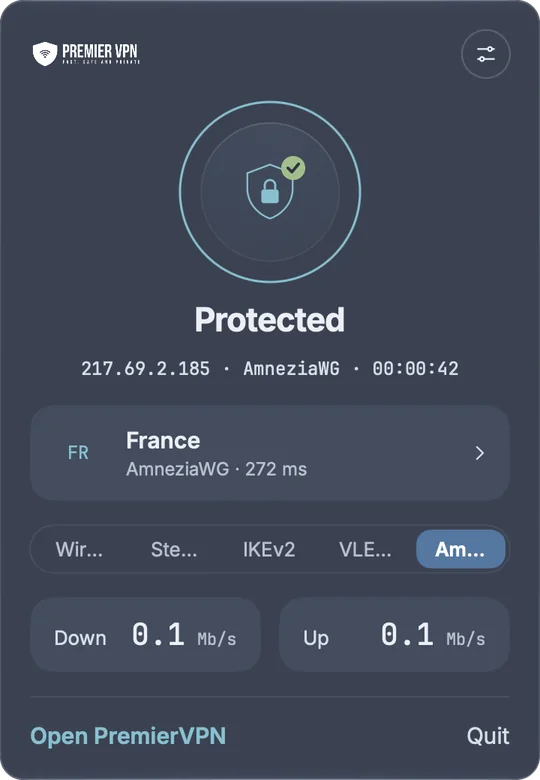
Menu bar popover
Match style, Always Glass or Always Signal.

DNS

Leak protection
"Send every DNS lookup through the tunnel." Keep this on.
Ad blocking
Uses AdGuard DNS while connected, blocking ads and trackers for the whole Mac, not just the browser.
DNS server
PremierVPN (recommended), Google, Cloudflare, Quad9 or AdGuard. Lookups still travel through the tunnel. Changes apply on the next connection.

General

Menu bar
Keep running in the menu bar when the window closes; Hide the Dock icon.
Notifications
Tells you when the connection drops or your IP changes. If macOS hasn't given permission yet, an Allow notifications button appears; if it was refused, turn it on in System Settings › Notifications.
Logging
"Keep connection logs for 7 days. No sites, traffic or DNS lookups."

Diagnostics

Status
App version, protocol, server, DNS (tunnel or network resolver) and the last error.
Connection test
Opens the Security Dashboard and runs the leak test.
Logs
Export logs saves a file to send to support; View opens them in the app. Connection events and errors only.
Contact support
Opens PremierVPN support: UK-based, 24/7.
Appearance settings in the Signal style: Glass or Signal, the Frost, Teal and Snow accents, and the menu bar popover style
Settings · Appearance · Signal style
13 Account

Manage your account

Open Settings › Account, or click the account card at the bottom of the Glass sidebar.

Account
Your email, how you sign in (password, or password and two-factor) and your plan.
Plan details
How many devices can connect at once, the renewal or end date, and the billing period.
Manage plan
Opens Apple's subscription page for App Store plans. Plans bought on premiervpn.net are managed in the portal, and the app says so.
Also here
Dedicated IP, two-factor status, your VPN username and Member since. PrMail and Vault links appear when available.
Sign out
Disconnects you. Your settings, favourites and style stay on this Mac.
Delete account…
Explains what's removed: the account, devices, settings, VPN credentials and any dedicated IP. It asks for your password and for you to type DELETE. Deleting the account doesn't cancel an App Store subscription, so use Manage subscription first.

If your plan lapses, Your plan has ended offers Renew, Restore purchases, Refresh (for a plan renewed on another device) and Sign out. Your settings, favourites and style are kept.

Signal style

Every detail, live

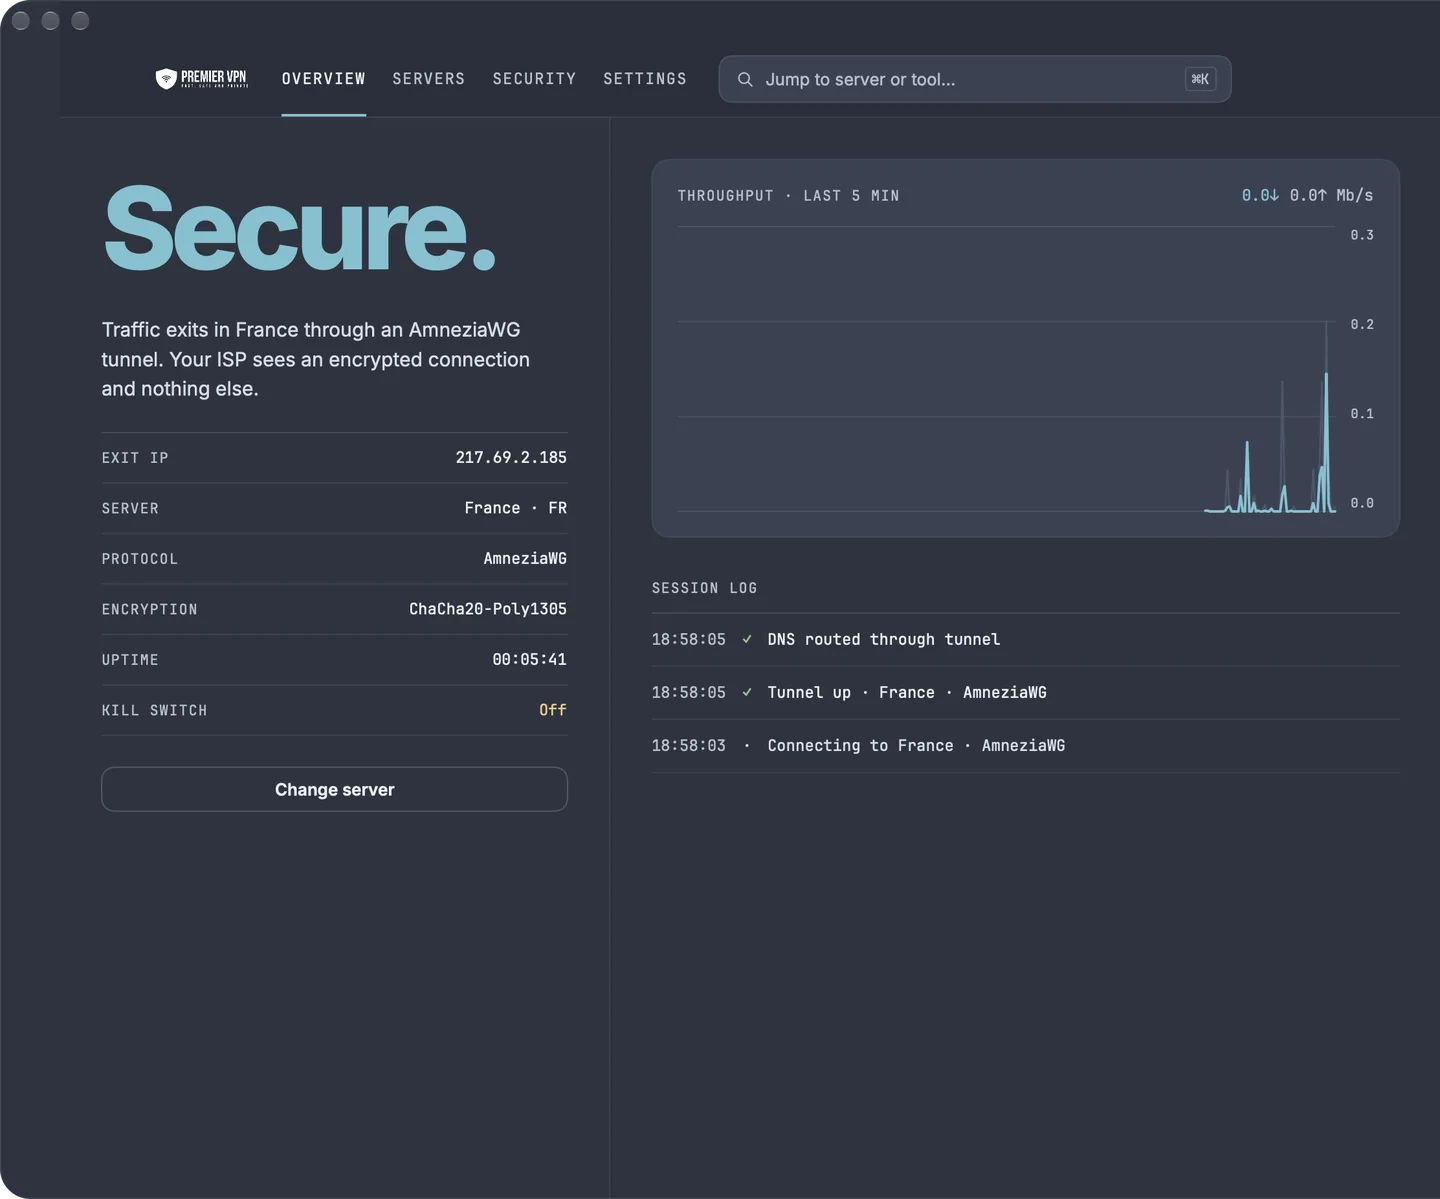
The Signal style shows the same things in a denser layout: a status pill, a data table with your exit IP, server, protocol, encryption, uptime and kill switch, a five-minute throughput chart and a session log of connection events.

The Overview in the Signal style: Secure., traffic exits in France through an AmneziaWG tunnel, with the exit IP, server, protocol, encryption, uptime and kill switch, a throughput chart and the session log
Overview · Signal
Keyboard shortcuts

Get around with the keyboard

Overview⌘1
Locations⌘2
Protocols⌘3
Security Dashboard⌘4
Dedicated IP⌘5
Settings⌘6
Search locations⌘K
Connect or disconnect⇧⌘Return
Open the main window (from the popover)⌘O
Quit PremierVPN⌘Q

In the Signal style you can also double-click a location to connect, press ⌘C on a location to copy its hostname, and hold Disconnect to disconnect.

System Settings › VPN

The VPN configurations the app adds

macOS asks you to allow a VPN configuration during setup, or on your first connection if you skipped it. VLESS and AmneziaWG each add their own configuration the first time you use them, so macOS asks once for each: PremierVPN VLESS and PremierVPN AmneziaWG. That's expected.

Only one runs at a time and the app switches between them for you, so there's nothing to change in System Settings. If you remove one there, the app asks to add it again the next time it's needed.

Troubleshooting

Something not working?

It connects, but nothing loads

Click the button to try the suggested protocol. Stealth or VLESS usually work on restrictive Wi-Fi, such as in hotels, airports and workplaces.

It fails on one location only

Choose another city nearby. If AmneziaWG has just failed on a location, the app skips it there for a short time and tries the next protocol.

No connection after my Mac wakes up

Wait a few seconds: with Reconnect if the connection drops on, it reconnects by itself. If it doesn't, disconnect and connect again. IKEv2 is the most stable choice across sleep and wake.

The internet stops when the VPN drops

That's the kill switch protecting your Mac. Reconnect, or turn the kill switch off in Settings › Connection.

I refused "Add VPN Configurations"

Connect again and choose Allow. If it's still blocked, remove PremierVPN in System Settings › VPN and connect again.

The leak test shows "Your network's resolver"

Your DNS lookups are leaving outside the VPN. Make sure DNS leak protection is on in Settings › DNS, then disconnect and reconnect.

The kill switch says "Not used"

You're connected with Stealth, IKEv2 or VLESS, which don't use the kill switch. Choose WireGuard® or AmneziaWG if you need it.

My plan isn't showing after I paid

On the plan screen, use Restore purchases or Refresh.

I can't sign in

Use the same email and password as portal.premiervpn.net, and check you can log in there first. Forgotten your password? Click Forgot password? in the app, or reset it here. If you signed up with Google or Apple on our website, set a password in the portal under Settings first.

How do I change or cancel my subscription?

If you subscribed in the app, Apple manages it: use Manage plan in Settings › Account, or open the App Store, click your name, then Account Settings › Subscriptions. If you subscribed on our website, manage it in the portal.

Support asked for my logs

Go to Settings › Diagnostics, click Export logs and send the file by Mail or Messages, with the time the problem happened. Logs show connection events and errors only: no sites, no traffic, no DNS lookups.

I need more help

In the app, go to Settings › Diagnostics › Contact support. You can also visit our Support & Help Centre or open a support ticket. Our support team is UK-based and available 24/7.

Ready to get started?

Install PremierVPN from the Mac App Store and you're one click from protected.

Stay Ahead of Online Threats

Get VPN tips, security insights, and exclusive offers delivered straight to your inbox. No spam — just the essentials.

Unsubscribe at any time. We respect your privacy.

PremierVPN Support